
October 10, 2019

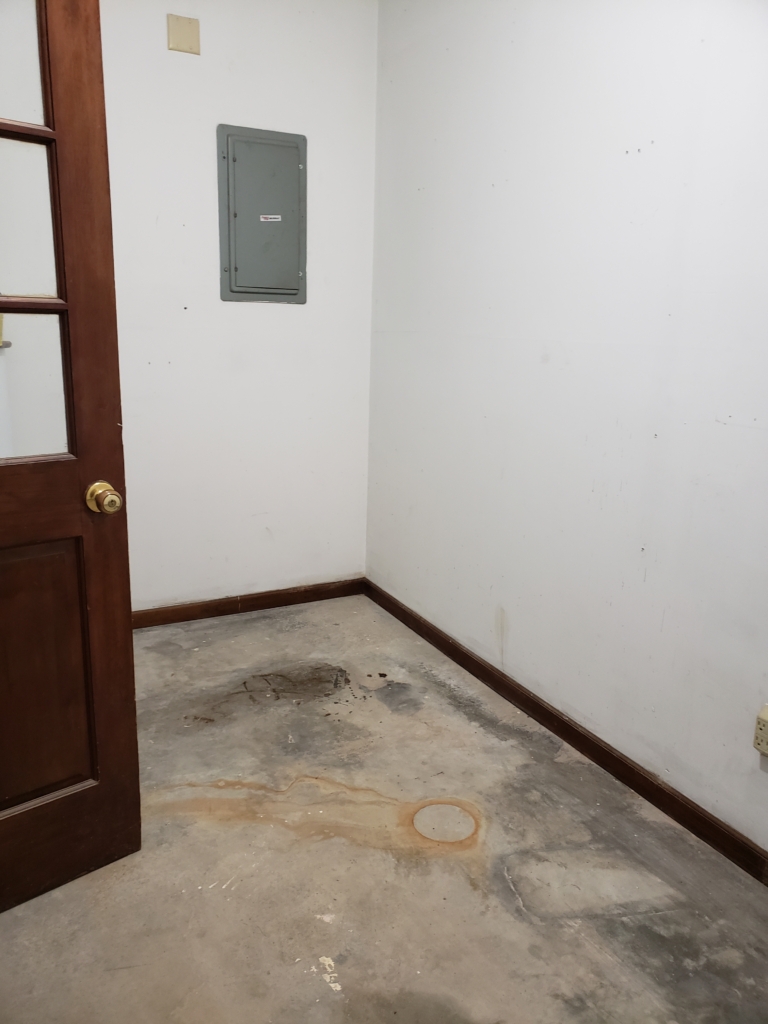
I am seriously so excited about how my mom cave/studio space is coming together! I actually need to finalize an official name for the space, but I will figure that out later. This week is all about the walls and the floors! Now this is a relatively small space. I believe the dimensions are around 13 feet by 6 feet. That makes some of these projects go by relatively quickly. As a reminder, this is what the space looked like prior to starting the challenge.

And this is where we are now.

The first thing we did was put in the new floors. I am not going to lie, we literally went to Home Depot and looked for the cheapest floors that still fit my aesthetic. These floors were less than $1 per square foot. We decided to go with laminate because they are somewhat durable. After all, this room is in the garage and it houses our water heater so there is no way we would have considered putting hardwood floors in here. If something were to happen with the water heater leaking (God forbid!) I would not be too disappointed in having to replace floors that cost us less than $100 to purchase plus a little sweat equity.
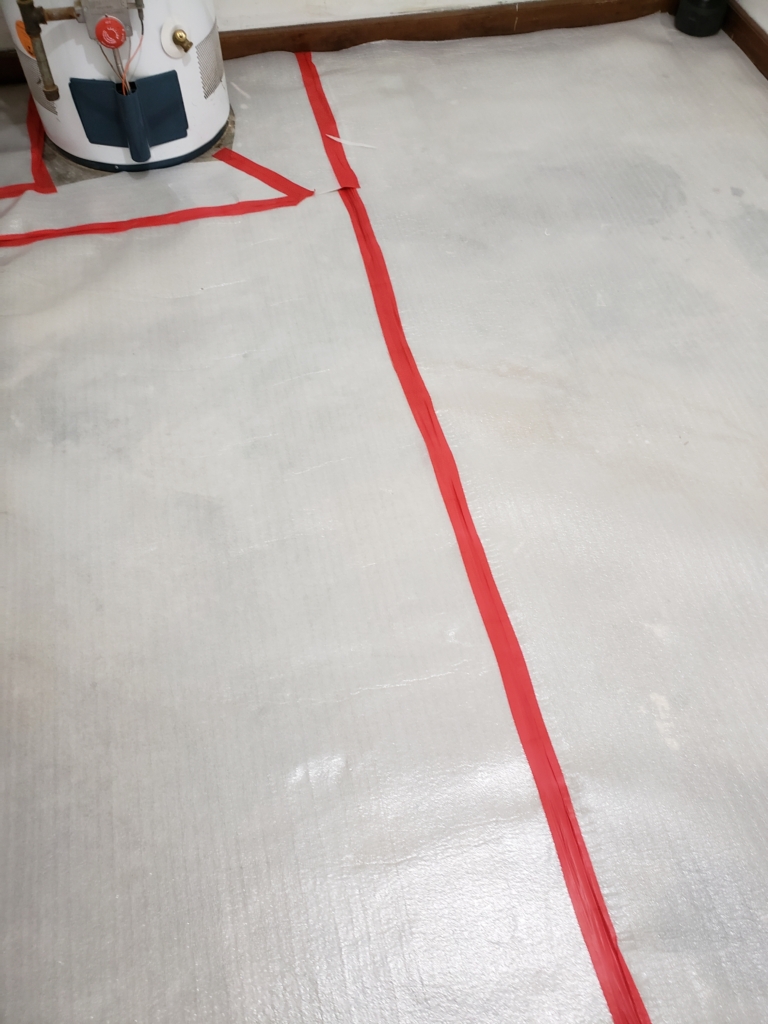
Before we could install the floors, we of course had to clean the floors. After cleaning the floors, we laid underlayment down and used this red tape to connect the seams. In all honesty, I really tried to do this part by myself and failed miserably. For some reason, I just could not get the material to fit snug enough in the corners without one end moving. Thankfully, my husband is pretty resourceful, particularly in areas where I am not and came in to rescue me before I made too big of a mess.

As you can see, he simply grabbed some weights from his gym and used them to anchor the corners. I would suggest that if you are using the same type of floor and underlayment that you use whatever you have as well that is heavy. I attempted to use tape initially and that was extremely ineffective. The underlayment was pretty simple though, you just cut it with scissors or a box cutter and attached the pieces together with the red tape stuff. This tape is created specifically for this, so I am pretty sure that just any tape would not be sufficient. But, I am also the person that could not figure out how to anchor the corners so do not take my word for it. It looked easy enough from my view!
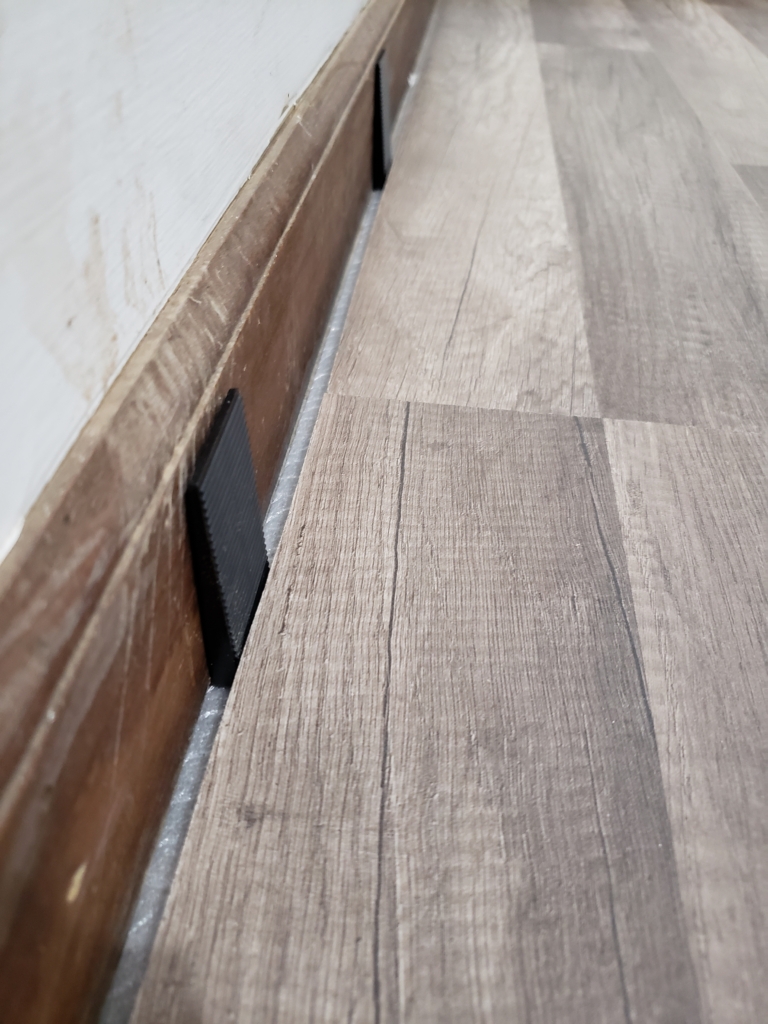
After that, we took a minute to figure out the spacing for the first row and Joe made the necessary cuts using his table saw. One thing he wanted to avoid was making the same cut in the same place, creating a long line in the pieces where the seams are. So he staggered the cuts a bit so that was not an issue.

The pieces connected like a puzzle but did require a little shimmying and a few taps of the mallet to get them fully locked in and laid down tight. Before continuing to the second row, we placed spacers between the wall and the boards. The spacers simply allow a little space for the flooring to adjust with the fluctuations in temperature so they will not buckle. When we first moved into this house, we had laminate floors that were not installed properly. They were installed right up against the wall and right in the middle of our floor a huge mound arose as the temperature changed with the seasons. Our son could literally use it as a ramp for his little tricycle. We knew that we did not want that issue out here so we made sure to allow for that room. We got these little spacers in a basic flooring kit from Home Depot, although I am sure you can find them elsewhere. We installed the spacers all the way around the room and they create about a 1/4 inch distance between the wall and the flooring.
Once all of the pieces were in, we added the quarter round and were basically ready to move on to painting!
There is no logical reason for why we installed the floors before painting. I initially wanted to paint first so we would not have to worry about covering and protecting the floors. However, we had a little momentum and excitement going with the floors so we decided to just go with it. I also figured that I would have to whip out the paint again to paint the quarter round if we painted first and then installed the floors so either way it would not matter.
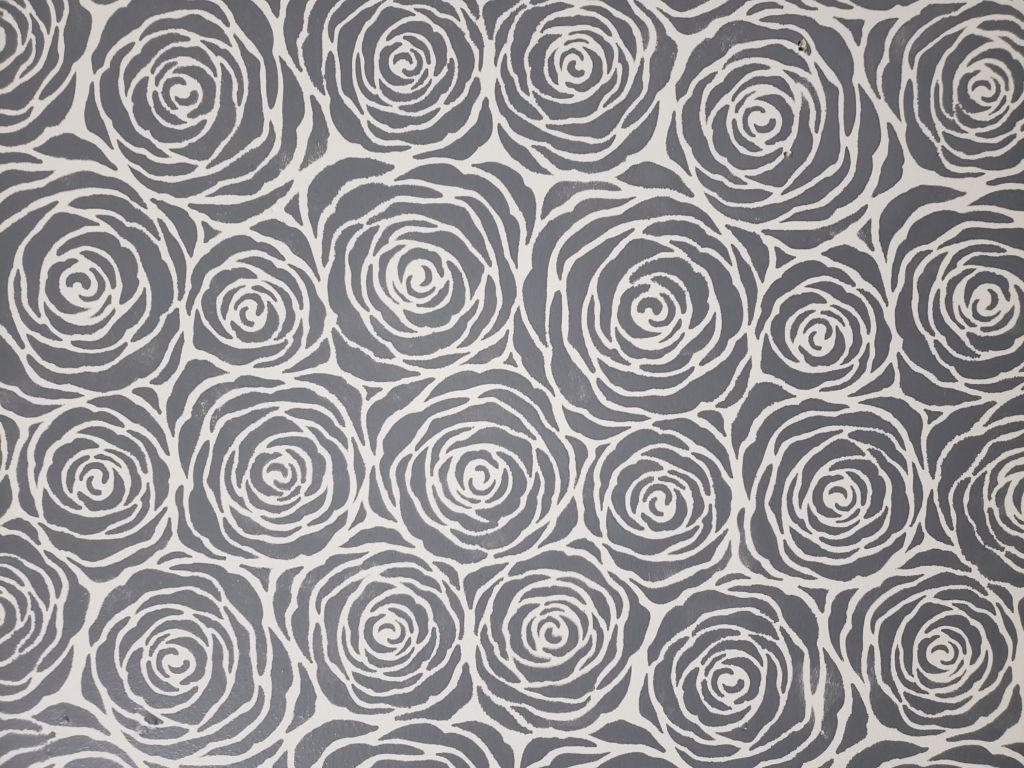
For the walls, I started with painting everything in Alabaster by Sherwin Williams. Just about every room that has white paint in our house is Alabaster. I like to keep things consistent and simple. It also really helps when I need to touch something up because I know that I always have the right color on hand. No confusion! For the stenciled color we went with Seriously Gray, also by Sherwin Williams.
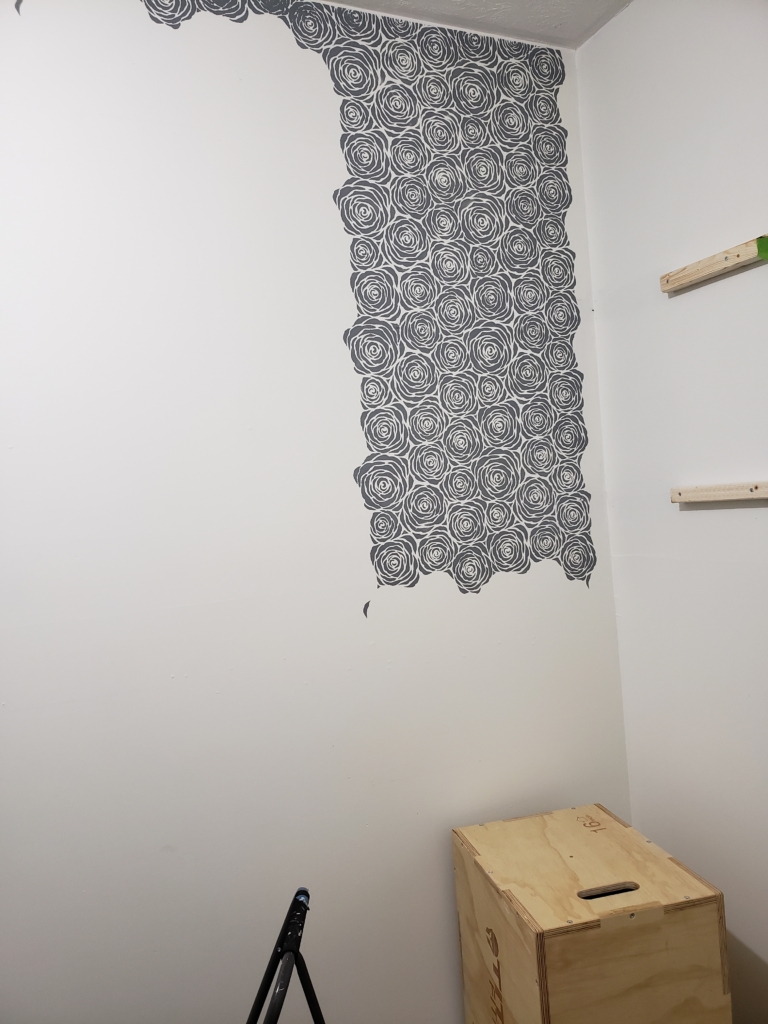
Painting the stencil was pretty simple as well. I purchased the stencil from Cutting Edge Stencils. It is the rose wall stencil and I chose the large size. The stencil itself has guides on it that tell you exactly where to place it. The only issue I had was with accessing the top of the wall. I realized that the ceilings out here are way higher than our ceilings in the house so my little step stool was not going to cut it for me. Thankfully, my husband is significantly taller than I am and he stepped in once again to help me out. This stencil comes with a different piece for the top of the wall. It just allows you to get a little closer than the primary stencil would to the ceiling. After the top part was stenciled, I was pretty much good to go and was able to move through the rest of the wall easily.

I will say that it is pretty important that your roller not be soaked, like you literally do not want to have too much paint on the brush because it will bleed through. I did have some bleed through when I was not paying attention to the amount of paint and I regret it. One way to correct it would be to go back through with a very small brush with white paint and paint over the parts that bled through. There were also times where I must have placed the stencil crooked in it’s previous location which caused me to have to make up for that shift in the next spot. That was a little frustrating. Thankfully, this stencil is pretty forgiving and you cannot really tell unless you study the wall super closely.

This particular stencil uses a petal of the rose shape as a guide. Essentially, you just line up the previously painted petal with the stencil in the new position and secure the stencil to the wall. I know that some people spray the back of their stencil to adhere it to the wall. I actually just used the delicate frog tape which is made specifically to not take up the paint under it.
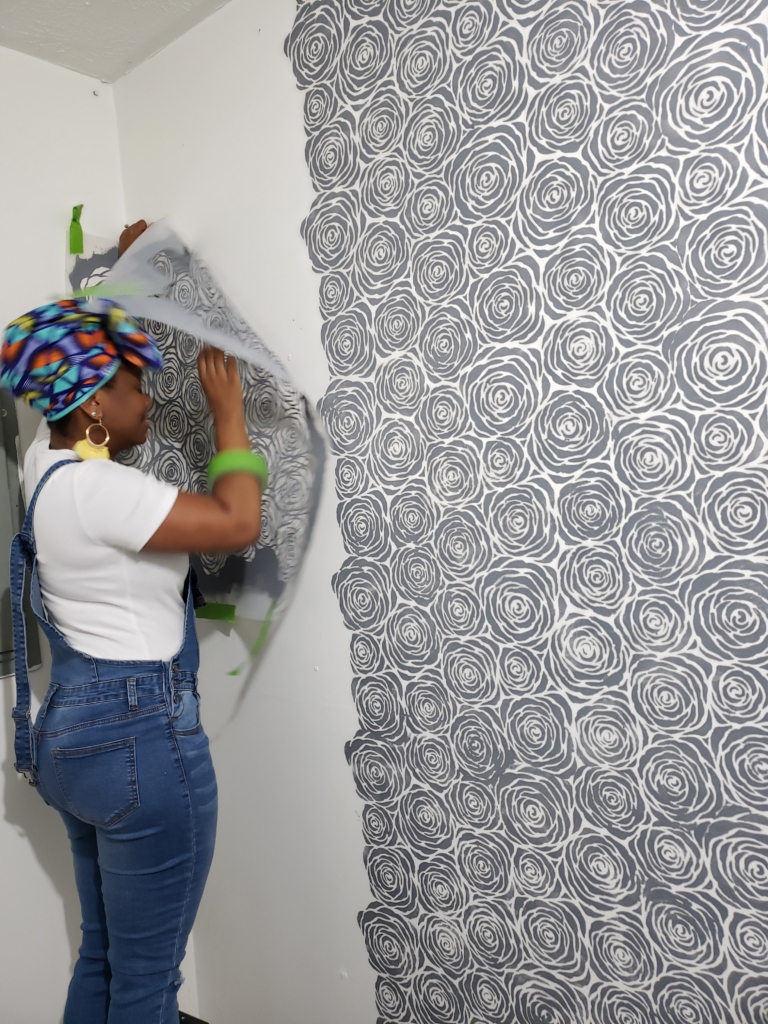
I will also say that the stencil itself is definitely large. I am also a little on the shorter side, 5’1″, so it was a little challenging to maneuver the stencil and get it situated. The image above illustrates what every stencil placement looked like at some point, the stencil would literally fall on me as I struggled to get it up on the wall. If you are petite like me, you may want to have someone assist you or chose a smaller stencil.

So, that is where we are this week. Floors done. Walls done. Next week we will move on to the floating shelves and desk! Thank you for joining me this week! Be sure to go check out the other guest participants here.


What an improvement!!! Laying flooring is such a good skill and transformation. Great job already!!
Thank you so much! It definitely has me wanting to change the floors in multiple spaces now!
I love the stencil! What a lovely way to soften the walls. This is going to be a fabulous room!
I agree the stencil definitely does soften the walls so much! Thank you!
Your space is looking great. the floral stencil is really a fun touch. looking forward to seeing more in the coming weeks.
Thank you so much Shelly! I was nervous initially about how it would work but I love it now!
You go girl!! hanging shelves will be a breeze next week now that you’ve installed flooring 🙂
Thank you Alisa! Absolutely! The flooring installation is the one thing that intimidated me a little about doing this room and it wasn’t bad at all! I am ready to move on to the next thing!
Wow! The stenciling looks so rad 🙂 I love that you’re making a mom cave!!
Thank you Jenna! The mom cave is so necessary! I think all women should have a space where they can rejuvenate and create!
Your room looks so beautiful already! The stencil looks so cheerful and classic. I’m going to be stenciling my floor next. if I have as much success as you did, I will be very happy. good luck with your one room challenge, i’m sure you will nail it!
Thank you Heidi! I am sure your floor will look amazing!
I love the stencil design that you chose for this room! Gray is my favorite neutral so I’m loving the way your finished wall is looking, too. Good luck with the next steps!
Thank you Elizabeth! I am so glad that I chose gray for this wall!
I am loving what you have done so far! I so excited to see the final reveal!
Thank you Linda! I am having so much fun putting this space together!
Oh my GOODNESS, THE STEMCIL LOOKS AMAZING! I’M NOT SURE I’D HAVE THE PATIENCE FOR THAT, BUT IT MAKES A BEAUTIFUL IMPACT!
Thank you so much Betsy! I absolutely love it as well!
Comments